Ad Blocker Detected
Our website is made possible by displaying online advertisements to our visitors. Please consider supporting us by disabling your ad blocker.
A tiny layer of scale can turn a water ionizer’s electrodes into a major maintenance concern. We’ll show you how to check your model’s instructions, choose approved cleaners and tools, and remove buildup without damaging electrode coatings or seals. We’ll also cover what to check if flow stays weak after cleaning—and why the safest next step may depend on one detail in your unit’s manual.
Key Takeaways
- Check the ionizer’s exact model manual for approved cleaning methods, descaling agents, concentrations, and maintenance intervals.
- Switch off and unplug the unit, shut off water as directed, and wear gloves and eye protection when handling descaler.
- Use the built-in cleaning cycle for light film; descale visible deposits only as the manufacturer instructs.
- Clean gently with approved nonabrasive tools; don’t scrape electrodes, immerse electrical parts, or use unapproved chemicals.
- Stop if electrodes or seals are damaged; reassemble as instructed, check for leaks, and contact the manufacturer if problems persist.
How to Clean Water Ionizer Electrodes Safely
To clean water ionizer electrodes safely, we should follow the manufacturer’s instructions and disconnect the unit from power before servicing it. Close the water supply, then remove the cartridge or access panel only as directed. Wear protective gloves and eye protection, especially if the cleaning solution is acidic. Use only the specified descaling agent and concentration; household cleaners, abrasives, and metal tools can damage electrode coatings. Apply the solution without immersing electrical components, and avoid scraping the plates. Rinse thoroughly with clean water, ensuring no residue remains, then reassemble the unit and check for leaks before restoring power and water flow. Good electrode safety also means keeping hands dry around electrical connections. Set cleaning frequency according to water hardness, usage, and performance changes, rather than using an arbitrary schedule. Stop if you notice damage.
Check Your Model’s Cleaning Instructions
Let’s consult your ionizer’s user manual before cleaning its electrodes. We should follow the model-specific steps for cleaning agents, cycles, and electrode access. If the instructions differ from general guidance, use the manufacturer’s procedure.
Consult the User Manual
Before cleaning the electrodes, check your model’s user manual for its approved procedure and maintenance schedule. We can find manual copies on the manufacturer’s website using the model number on the unit’s label. Confirm that the document matches your exact model and revision; similar units may have different materials or maintenance requirements. Verify warranty terms before using any cleaner or service method, since unapproved maintenance may affect coverage.
| Manual detail | What we should confirm |
|---|---|
| Model identification | Exact model and revision |
| Cleaning interval | Recommended timing |
| Approved materials | Permitted cleaners and tools |
Use the manual as the authority for maintenance limits, not general advice for another ionizer. If the document is missing or unclear, contact the manufacturer before proceeding. Keep the manual accessible for future reference and record the date we checked its guidance.
Follow Model-Specific Steps
Once we’ve confirmed the manual matches our ionizer, we should follow its model-specific cleaning steps in order. Different models may use distinct manufacturer specific cleaning cycles, valve positions, or approved solutions. We shouldn’t substitute a procedure from another unit.
- We’ll switch off the ionizer and disconnect power as directed.
- We’ll close the inlet valve before opening the cleaning port.
- We’ll measure only the specified descaling solution and water.
- We’ll run the stated cycle, watching for leaks or unusual sounds.
- We’ll flush the system for the manual’s full rinse time.
We should note the cycle duration and any error codes, then restore normal connections. If a step is unclear, we’ll contact the manufacturer before proceeding. Unapproved chemicals or methods could damage plates and affect electrode warranty coverage. We’ll keep the manual’s maintenance record with the unit.
Choose the Right Cleaning Method and Supplies
We’ll choose a cleaning method that matches your ionizer’s electrode material and the manufacturer’s instructions. Use only approved supplies, since harsh chemicals or abrasive tools can damage electrode surfaces. Before cleaning, gather the recommended materials and disconnect the unit as directed.
Choose a Cleaning Method
How should you clean water ionizer electrodes without damaging their coatings or surrounding components? We’ll choose a method based on the manufacturer’s instructions, electrode condition, and scale severity. Don’t scrape plates or dismantle the cell unless the manual directs you; either action can damage seals or coatings. First, disconnect power and water, then inspect the accessible chamber.
- For light film, run the unit’s built-in cleaning cycle.
- For visible scale, follow the model-specific descaling procedure.
- For stubborn deposits, contact the manufacturer before attempting service.
- Avoid abrasive scrubbing that could scratch electrode surfaces.
- Reassemble only as instructed, then check for leaks.
Cleaning frequency depends on water hardness, usage, and buildup causes, including mineral content and operating conditions. Record each cleaning and note changes in flow or taste. We’ll adjust the interval using those observations and the manufacturer’s guidance, rather than applying one schedule to every ionizer.
Select Safe Supplies
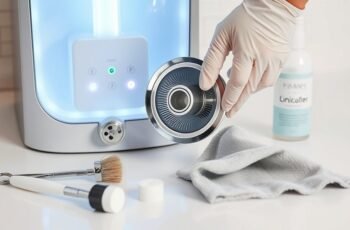
Choose cleaning supplies only after checking your ionizer’s manual, since electrode coatings and seals can react differently to acids and cleaners. Use only the descaling solution and concentration the manufacturer specifies; don’t substitute vinegar, bleach, or household detergents unless the instructions approve them. These products may corrode metal, damage coatings, or leave residues in the water path. Select nonabrasive tools, such as a soft nylon brush or lint-free cloth, to remove loosened deposits without scratching electrode surfaces. Avoid steel wool, scouring pads, and sharp picks. If the manual permits a container or funnel, choose food safe materials that tolerate the solution and won’t shed particles. Wear gloves when handling cleaners, and prepare them in a ventilated area. Rinse components as directed, then inspect seals and electrodes before reassembly. Don’t mix cleaning chemicals.
Remove Mineral Buildup Without Damaging Electrodes
- Unplug the unit and remove the electrode assembly as directed.
- Photograph white, chalky scale before cleaning to document its location.
- Soak only approved parts in the specified descaling solution for the stated time.
- Use a soft, nonabrasive brush to lift loosened residue without pressing on plates.
- Rinse thoroughly with clean water, then inspect coatings and seals under bright light.
If deposits remain, repeat only within the manufacturer’s limits. Stop if you see pitting, peeling, discoloration, or damaged seals, and contact the manufacturer before reassembly.
Troubleshoot Poor Flow After Electrode Cleaning
If water flow drops after electrode cleaning, check for a kinked hose, a clogged inlet screen, or a filter disturbed during reassembly. We’ll isolate the cause before running the ionizer again.
| Check | Action |
|---|---|
| Tubing | Inspect tubing connections; straighten kinks and reseat loose fittings. |
| Inlet screen | Remove trapped debris, then reinstall the screen securely. |
Next, Test inlet pressure against the manufacturer’s specified range. Low pressure points to a supply issue; normal pressure shifts attention to the filter or internal flow path. Confirm the filter sits in its housing correctly and that its seals aren’t pinched. Restore water slowly, then check each connection for leaks. Compare the outlet stream with its pre-cleaning rate. If flow remains weak despite adequate pressure and correct assembly, stop using the unit and contact the manufacturer or a qualified technician. Don’t force fittings or bypass the filter; either action can cause leaks or damage.
Prevent Electrode Buildup With Regular Maintenance
Regular maintenance slows mineral buildup on ionizer electrodes and helps preserve consistent output. We can make routine maintenance effective by matching care to our water’s hardness and the manufacturer’s schedule. For mineral prevention, use these practical cues:
- Check electrode surfaces monthly for chalky white deposits.
- Rinse the chamber with clean water after approved cleaning cycles.
- Inspect inlet screens for scale that could restrict flow.
- Replace filters on schedule to reduce particles and mineral load.
- Record cleaning dates and changes in output or taste.
We shouldn’t scrape plates or use household acids; either can damage coatings and seals. If deposits return quickly, we can test hardness and review the unit’s settings or service guidance. Consistent checks help us catch buildup early, limit harsh cleaning, and keep water production stable. Always disconnect power before opening the unit.
Frequently Asked Questions
How Does Electrode Scaling Affect Water Ionizer Performance?
Scaling coats electrodes, reducing effective surface area and disrupting electrolysis. We may see lower efficiency, weaker pH separation, and reduced flow as deposits restrict passages. Regular descaling helps restore performance and protects your ionizer from premature wear.
Can Dirty Electrodes Change the Taste or Odor of Ionized Water?
Yes, dirty electrodes can alter taste and odor. We may notice a Metallic Aftertaste or unusual smells as deposits affect electrolysis and encourage Odor Absorption. Check electrode condition and follow your manufacturer’s cleaning guidance.
How Often Should a Water Ionizer’s Electrodes Be Professionally Inspected?
We recommend professional inspection annually, though maintenance intervals vary by usage, water hardness, and manufacturer guidance. Check your manual, and schedule service sooner if you notice reduced flow, unusual taste, or declining ionization performance.
When Should Worn Electrodes Be Replaced Rather Than Cleaned?
Replace worn electrodes when cleaning can’t restore performance, or when we find pitting, cracks, peeling coatings, or persistent corrosion—signs of damage. Don’t throw good money after bad; compare replacement costs with manufacturer guidance and service recommendations.
Does Electrode Buildup Affect the Ionizer’s Water pH Readings?
Yes, buildup can shift readings by reducing electrode performance and disrupting water flow. We recommend cleaning electrodes, then checking pH calibration and sensor accuracy against a trusted standard; if readings remain inconsistent, inspect or replace worn components.
Conclusion
By following your model’s manual, using approved cleaners, and avoiding abrasive tools, we can remove mineral buildup without risking electrode coatings or seals. After cleaning, rinse thoroughly, reassemble carefully, and check for leaks before restoring power. If flow remains weak or you spot damage, stop and contact qualified service rather than forcing a fix. A little routine care goes a long way: it helps keep your water ionizer running smoothly and prevents small deposits from becoming a bigger headache.